JQuery – Deferred, then, Apply

One simple example on how to use

1
2
3
4
5
6
7
8
9
10
11
12
function getPromise() {
    var deferred = $.Deferred();
    deferred.resolve("Hello");
 
    return deferred.promise;
}
 
getPromise().then(
    function(data) {
        console.log(data); // output 'hello'
    }
);

will put JQuery Deferred-then-Apply source code analysis later on.

VPS – add Swap to enhance performance

VPS normally does not have any swap space.

1
2
3
4
5
6
7
8
9
10
sudo /bin/dd if=/dev/zero of=/var/swap.1 bs=1M count=1024
sudo /sbin/mkswap /var/swap.1
sudo chmod 600 /var/swap.1
sudo /sbin/swapon /var/swap.1
 
/etc/fstab:
/var/swap.1 swap swap defaults 0 0
 
# if it not mounted as swap, using command 
sudo /sbin/swapon /var/swap.1

swap size should be 2 times than Memory for 512MB, 1GB Memory.
Why? take Memory size 512MB for example, when 512MB is full, it will put into some of data into swap,
if now machine is sleeping, it will put 512MB into swap.
therefore, ideally swap should be 2 times than physical memory.

However, for large memory such as 16GB, swap size is based on what you need, for example, 2GB.

Ionic using Sqlite

Sqlite is better than ‘local storage’ and ‘session’ for complex data relationship on ionic/cordova platform.

Here is instruction on how to install

1. create an empty ionic app
$ ionic start myApp blank –type ionic1

2. add Cordova for sqlite native plugin
$ bower install ngCordova
it will install ‘www/lib/ngCordova/’.

3. install sqlite native plugin
$ ionic cordova plugin add cordova-sqlite-storage
$ npm install –save @ionic-native/sqlite

4. in www/index.html, add

5. in app.js make app.js looks like.

1
2
3
4
5
6
7
8
9
10
11
12
13
14
15
16
17
18
19
20
21
22
23
24
25
26
27
28
29
30
31
var myApp = angular.module('starter', ['ionic','ngCordova'])
 
    .run(function($ionicPlatform, $cordovaSQLite) {
 
        $ionicPlatform.ready(function() {
            if(window.cordova && window.cordova.plugins.Keyboard) {
                // Hide the accessory bar by default (remove this to show the accessory bar above the keyboard
                // for form inputs)
                cordova.plugins.Keyboard.hideKeyboardAccessoryBar(true);
 
                // Don't remove this line unless you know what you are doing. It stops the viewport
                // from snapping when text inputs are focused. Ionic handles this internally for
                // a much nicer keyboard experience.
                cordova.plugins.Keyboard.disableScroll(true);
 
            }
            if(window.StatusBar) {
                StatusBar.styleDefault();
            }
 
            var db;
            if (window.cordova) {
                db = $cordovaSQLite.openDB({ name: "my.db" }); //device
            }else{
                db = window.openDatabase("my.db", '1', 'my', 1024 * 1024 * 100); // browser
            }
            $cordovaSQLite.execute(db,"create table if not exists people(id integer primary key, firstname text, lastname text)");
            //$cordovaSQLite.deleteDB("my.db");  
 
        });
    })

Key Important code:

1
2
3
4
5
            if (window.cordova) {
                db = $cordovaSQLite.openDB({ name: "my.db" }); //device
            }else{
                db = window.openDatabase("my.db", '1', 'my', 1024 * 1024 * 100); // browser
            }

this code snippet is key important because when running on browers using ‘ionic serve’, we use ‘window.openDatabase’ rather than native plugin.

passport.js with node.js to do Local Authentication

The whole example could be found in:
https://github.com/emacslisp/angular2/tree/meteor/passport-local

prerequisites

1. create an empty folder for project, say ‘passport-local’

1
2
3
4
5
6
7
npm init
npm install passport --save
npm install passport-local --save
npm install jade --save
npm install mongodb --save
npm install mongoose --save
npm install passport-local-mongoose --save

2. install mongodb and run
$ mongod

3. create an app.js

1
2
3
4
5
6
7
 
var path = require('path');
var express = require('express');
var http = require('http');
var mongoose = require('mongoose');
var passport = require('passport');
var LocalStrategy = require('passport-local').Strategy;

for more details check github project.

4. ‘node app’ to run the example

5. register user firstly, you will see ‘Account’ doc has been created with username, password and salt.

6. try to login to get session.

WordPress – analysis wp_admin_css(‘install’,true);

as we know css is key role for web page,

wordpress using wp_admin_css(‘install’, true); to print link css.
in format of <link href=’…/xxx.css’>

the most important statement.

1
$tag = apply_filters( 'style_loader_tag', "<link rel='$rel' id='$handle-css' $title href='$href' type='text/css' media='$media' />\n", $handle, $href, $media);

“<link rel=’$rel’ id=’$handle-css’ $title href=’$href’ type=’text/css’ media=’$media’ />\n” will be replaced
to be ‘<link rel=’stylesheet’ id=’install-css’ href=’http://localhost:8082/wordpress2/wp-admin/css/install.min.css?ver=4.7.2′ type=’text/css’ media=’all’ />

Let’s look at what define of apply_filters, “apply_filters($tag,$value)”. ‘style_loader_tag’ has nothing in global variable $wp_filter.

Therefore, apply_filters do nothing here, it only return second param as string to print.

1
2
3
4
echo $conditional_pre;
echo $tag;
$this->print_inline_style( $handle );
echo $conditional_post;

gdb – enable gdb on mac os

Mac OS X 10.10.2 does not come with gdb pre installed. It is available on homebrew:

$ brew tap homebrew/dupes
$ brew install gdb
The binary is installed on /usr/local/bin

When initializing gdb on a program (a.out) it will produce the following error:

Starting program: a.out
Unable to find Mach task port for process-id XXXXX: (os/kern) failure (0x5).
(please check gdb is codesigned – see taskgated(8))
Start Keychain Access application (/Applications/Utilities/Keychain Access.app)
This error occurs because OSX implements a pid access policy which requires a digital signature for binaries to access other processes pids. To enable gdb access to other processes, we must first code sign the binary. This signature depends on a particular certificate, which the user must create and register with the system.

To create a code signing certificate, open the Keychain Access application. Choose menu Keychain Access -> Certificate Assistant -> Create a Certificate…

Choose a name for the certificate (e.g., gdb-cert), set Identity Type to Self Signed Root, set Certificate Type to Code Signing and select the Let me override defaults. Click several times on Continue until you get to the Specify a Location For The Certificate screen, then set Keychain to System.

Double click on the certificate, open Trust section, and set Code Signing to Always Trust. Exit Keychain Access application.

Restart the taskagted service, and sign the binary.

$ sudo killall taskgated
$ codesign -fs gdb-cert /usr/local/bin/gdb

update:
mac os sierra, gdb will show following error.
During startup program terminated with signal ?, Unknown signal.

touch ~/.gdbinit
vim ~/.gdbinit
copy “set startup-with-shell off” into the file and save
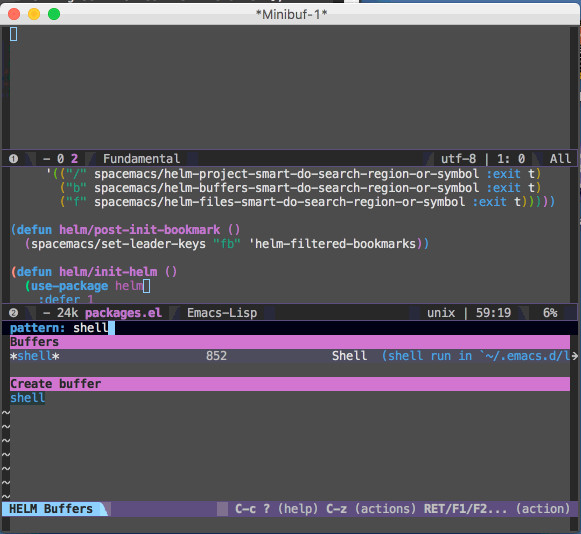
spacemacs – working with previous emacs config

1. fork from branch https://github.com/syl20bnr/spacemacs.git to you own github account

the reason why we should fork is to commit code changes for spacemacs in future.

move ~/.emacs to ~/.emacs1 as backup file

2. open ~/.emacs.d/init.el, at the end of buffer, add code to load .emacs file

in my computer, I put all .emacs configure into another file named .emacs_mac

;; move these code into the end of init.el
(if (>= emacs-major-version 25)
(load-file \”~/emacs/.emacs_mac_25\”)
(load-file \”~/emacs/.emacs_mac\”))

3. “M-x toggle-debug-on-error” is helpful command when error occurs. since spacemacs may connect to network and some server are not ready.

4. disable ‘M-x’ ‘C-x C-f’ because windows size changes too often.

in following picture you could see three windows, especially last one, when M-x key is press, it will become very large, later on it will be one line only.
spacemacs

here are steps for disabling them.
<1>open ~/.emacs.d/layers/+completion/helm/packages.el
<2>in function “helm/init-helm” search ‘global-set-key’ statement and comment out.

<3>after comment out everything , add following code into ~/.emacs.d/init.el

1
2
(ido-mode 0)
(helm-mode 0)

eclipse – map jar to source

As we know when we develop java, some special jar should be stepped into to investigate logical inside jar.

say there are 10 jar files has 10 zip file for source.

there is a better way to use eclipse UI. Here is inside .classpath file.

1
<classpathentry kind="lib" path="D:/dev/oltu/oauth-2.0/authzserver/target/org.apache.oltu.oauth2.authzserver-1.0.3-SNAPSHOT.jar" sourcepath="D:/dev/oltu/oauth-2.0/authzserver/src/main/java/org.zip"/>

Maven – different between -DskipTests and -Dmaven.test.skip=true

sometime when we build maven, junit will also be invoked to test code.

usually, these unit test will fail because of development machine configures are different.

there are two commands which could skip test.

1
2
$ mvn package -DskipTests
$ mvn package -Dmaven.test.skip=true

“-DskipTests” is to build test source code but don’t run them.
“-Dmaven.test.skip=true” don’t do anything for test source code, do not compile and do not run for test code.

Qt – ListView SetModel tip

when developing qt, QStringList should be display on ‘ui->listView’, However, following code won’t work.

1
2
3
4
5
6
7
8
9
10
11
12
13
14
MainWindow::MainWindow(QWidget *parent) :
    QMainWindow(parent),
    ui(new Ui::MainWindow)
{
...
    QDir myDir("C:\\");
 
    QStringList filter("*");
    QStringListModel model;
    QStringList filesList = myDir.entryList(QStringList(filter),QDir::Files | QDir::Dirs);
    model.setStringList(filesList);
    ui->listView->setModel(&model);
...
}

because ‘model’ object will be delete after function is done.

ui->listView will not be able to get model object.

move to MainWindow ‘model’ to MainWindow declare will be good.

1
2
3
4
5
6
7
8
9
10
11
12
13
14
15
16
17
18
19
20
21
22
23
24
25
26
27
28
 
class MainWindow : public QMainWindow
{
    Q_OBJECT
 
public:
    explicit MainWindow(QWidget *parent = 0);
    ~MainWindow();
    QStringListModel model;
private:
    Ui::MainWindow *ui;
};
 
 
MainWindow::MainWindow(QWidget *parent) :
    QMainWindow(parent),
    ui(new Ui::MainWindow)
{
...
    QDir myDir("C:\\");
 
    QStringList filter("*");
 
    QStringList filesList = myDir.entryList(QStringList(filter),QDir::Files | QDir::Dirs);
    model.setStringList(filesList);
    ui->listView->setModel(&model);
...
}